SeARch HeRE

Showing posts with label illustration. Show all posts

BoBoiBoy vs Fang artwork

Finished draw this, huih it took me 4 days to complete it. I tried to apply David Despau and Ibuki Satsuki style. Still need to improve here. BoBoiBoy is Malaysian 3D animation and it was created by AniMonsta. 

Synopsis and Profile:
BoBoiBoy is the new kid in town who lives with his grandfather, Tok Aba, who sells chocolate products in a mobile stall. He is very close to his grandfather and helps out in the stall after school except when he wants to play soccer where he usually makes tons of excuses. He is also a mischievous kid who likes to play pranks on people especially to his best friends Gopal, Yaya and Ying making him funny and annoying at the same time. As a superhero he has the power to control 3 elements- earth, wind and lightning. Ultimately he can split into three, forming 3 specialized elemental clones within a limited time. The last split-out version of BoBoiBoy that evolved. He forced himself to evolve when BoBoiBoy Lightning, BoBoiBoy Cycloneand all of his friends were defeated by Mukalakus. In this form, he is now able to project a new type of rock (Rocks from Lava) to project stronger earthquakes and a Giga. His color schemes are now black, red and gold. His clothes have glowing gold-colored patterns which resemble rocks. His eyes are also gold-colored.

Fang is a new character in the series. He is shown in some episodes that he is a hot-tempered guy, a show-off and jealous when his friends made fun of him. He never like BoBoiBoy because he's more cute, smart, and powerful than him. With his power, Shadow Manipulation, and together with BoBoiBoy and his friends, they will face a new enemy named Ejo Jo (Atata Tiga's General Commander). Fang is the deuteragonist in BoBoiBoy. Fang was BoBoiBoy's rival and unlike BoBoiBoy, he always do fight just to become popular.


Feel free check my deviantart here: http://eiri789.deviantart.com/ and also my pixiv:  http://pixiv.me/eiri789

Wau Bulan

Greeting to all, my Degree just finished, here I'm gladly to show my final artworks. Half of them is digital artworks. Here in my illustration, I draw an  old man that making the Wau Bulan or Moon kite, it's one of traditional game in kelantan, Malaysia.


Drawing


Impressionism style, my task. On canvas, it abot 4 feetx3 feet.

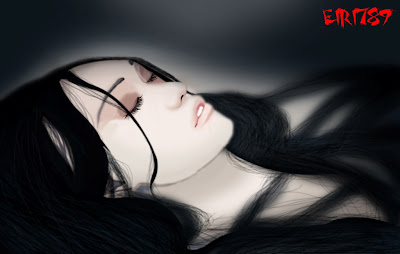
Dark Illustration


You can call it as despression, darkness, bloody or something else....

Art Process no.2 - Zemotion photo

Alright art process no.2. I took Zemotion's photo as my prey huhu. So, let's take a look.

Process 1: As usual, trace using Illustrator CS3 or Photoshop CS3. And then colour the base color which is basic colors


Process 2: Yes, I know th eyelashes was a bit hard to make by using mouse. So the tips is, download eyelashes brush at deviantart.com :)


Process 4: You need 2 change setting of your brush. Click brush, click right at smoothing and other dynamic option, the at click dynamic changed it 2 fade effect. Then, now coloured the eyebrow.

Process 5: My favourite is the lips. make the details, then erased the artlines.


Process 6: Coloured the hair black. All black.


Process 7: Then, add the hairlines. Detail the area that you want.

Process 8: Then, coloured some black to black blue, as the second hairlines.


Process 8: It should be like this. yes we almost finish.


Final Image:


As I can said: You need to practice more because colouring with mouse is 10 times harder than using tablet.

Digital Art Process (without tablet) - Aoi the GazettE

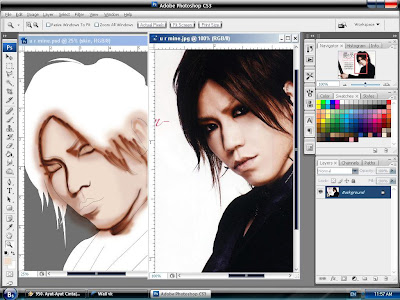
This is the process how I coloured artwork in Photoshop CS3. Most people doing this using tablet like wacom, kanvus light and so on. But, this can be done by using mouse since I'm using mouse not a tablet. So, from here you can see the whole process:


Process 1: First step: I trace the line using Adobe illustrator CS3. You can do Photoshop CS3 as well or just scan the line you made by hand. Alrite, after you're done with artwork, first you colour the artwork with basic colours including put the first shadow. I started with face first. I'm usually do hair at last. You can see in this pic:


Process 2: Then I'll start with eyes. It's not same like the original one but it's okay since it's a first try.


Process 3: Here you will detail the face and also coloured the lips. You can erased the previous artline you made at his lips and also nose.


Process 4: After that, I coloured the hair with black and adding first highlight with brown at his hair. as you can see, one layer for his hair, one layer for his face. basically it's 3 basic layers you need to done this process. Then, I use small brush 1 pixel and done the hairline. Finish with it, I copy the hairline and arranged it while playing with layer option and you will different colours of his hairlines.


Process 5: Then I erased some of coloured in the area I don't want.


Process 6: To make it hair look realistic, you need hair brush, as you can see the hair will look smooth.


The 7 process: Then you will finish the clothes:


The final image:


Since doing with mouse taking time, you should practice always and it's challenging more than using tablet.

When you can't close your eyes


yesterday couldn't sleep, so this is what happened huhuh

FreeLance PhotoGraphic Designer

My name is Ain Aznan and I am a freelance photo graphic designer based in Malaysia.

I have been dedicating my time to helping companies and individuals redesign and improve their corporate and portfolio design; making them simpler, clearer, more efficient and professional.

Please browse through my projects here to get a feel of my style and approach in web design.

If I am the right designer for you, please leave comment at my blog comment and I'll reply you about your needs. I enjoy meeting new clients and would love to **collaborate with you.

Good day.